Imagine you’re driving down a narrow residential street and realize you’ve missed your turn. There are no driveways to use, and the road is too tight for a U-turn. This is the exact scenario where a crucial driving maneuver comes into play: the 3-point turn. Also known as a K-turn or broken U-turn, this skill allows you to turn your vehicle around in a limited space by moving forward, backward, and forward again in three distinct “points.” For many new drivers, the 3-point turn can seem just as intimidating as parallel parking. It requires precision, spatial awareness, and careful observation of your surroundings.
However, like any driving skill, the 3-point turn can be mastered with a clear understanding of the steps and dedicated practice. This guide will break down the entire process into simple, easy-to-follow instructions. We will walk you through preparing for the turn, executing each of the three points flawlessly, and understanding the common mistakes to avoid. With tips straight from our professional driving instructors, you’ll gain the confidence to perform this maneuver smoothly and safely, both for your road test and for real-world driving situations.
What is a 3-Point Turn and Why Do You Need It?
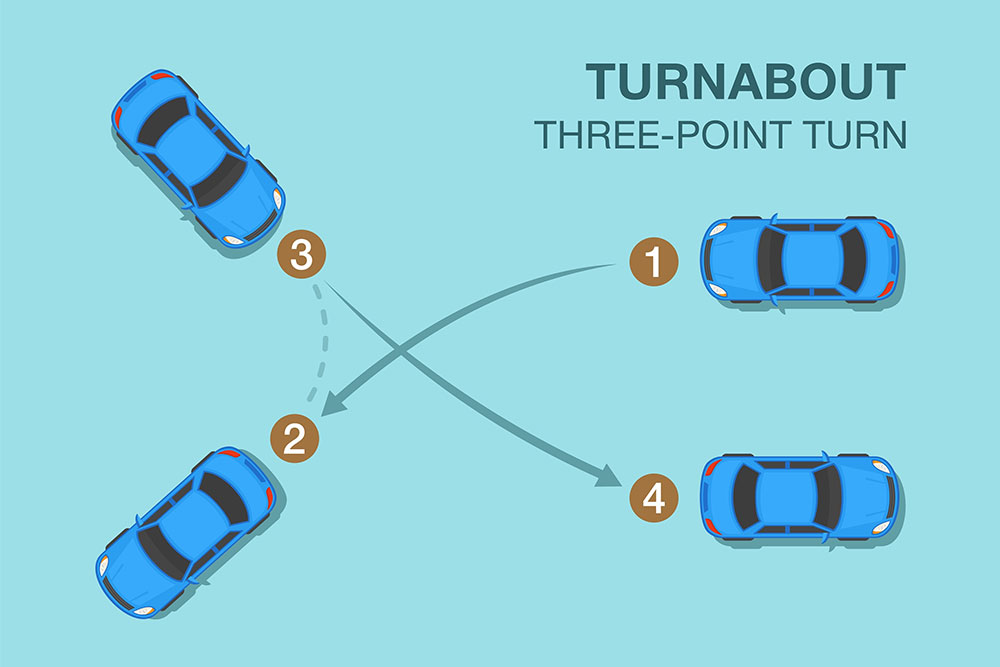
A 3-point turn is a standard method for turning a vehicle around to face the opposite direction on a narrow street. It’s used when the road is not wide enough to complete a U-turn in a single motion. The name comes from the three primary movements involved: a forward turn toward the opposite curb, a backward turn toward the starting curb, and a final forward movement to drive away in the new direction.
Mastering this maneuver is essential for several reasons:
- Road Test Requirement: The 3-point turn is a required element on most driving road tests. A driving examiner will use it to assess your ability to control the vehicle at low speeds, steer accurately, use your mirrors, and maintain constant awareness of your surroundings.
- Real-World Application: You will inevitably encounter situations where you need to turn around on a dead-end street or a narrow lane where pulling into a driveway isn’t an option. Knowing how to perform a 3-point turn saves you from having to back up a long distance, which is often more dangerous.
- Demonstration of Skill: Executing a smooth 3-point turn is a clear indicator of a confident and competent driver. It shows you have a strong command of your vehicle’s dimensions and can handle complex, low-speed maneuvers safely.
This skill is a fundamental part of a comprehensive driver’s education program. While reading about it is a great start, hands-on driving lessons provide the safest environment to practice and perfect it under the guidance of a trained professional.
Preparing for a Safe and Successful 3-Point Turn
Before you even start turning the wheel, a successful 3-point turn begins with careful preparation and observation. Safety is the number one priority.
1. Choose a Safe and Legal Location
The first step is to determine if it’s safe, legal, and necessary to perform the turn.
- Visibility: Find a spot with good visibility in both directions. You should be able to see at least 200-300 feet down the road to ensure you have enough time to complete the maneuver without interfering with oncoming traffic. Avoid performing a 3-point turn near a blind curve, on the crest of a hill, or in adverse weather conditions like heavy fog or rain that limit visibility.
- Legality: Ensure there are no signs prohibiting U-turns or 3-point turns in that area. It is illegal to perform this maneuver near intersections, in school zones during certain hours, or in business districts.
- Traffic Check: This is the most critical safety check. Look far ahead and behind you. Check your rearview and side mirrors. You need a significant gap in traffic from both directions. The entire maneuver can take 20-30 seconds, and you will be blocking the entire road at certain points. Wait until the road is completely clear.
2. Position Your Vehicle
Once you’ve found a safe spot and checked for traffic, position your car correctly to begin.
- Signal Your Intention: Turn on your right turn signal to communicate to any potential traffic that you are pulling over to the side of the road.
- Pull to the Right: Steer your vehicle as far to the right side of the road as you can and come to a complete stop. This gives you the maximum amount of space to complete the first “point” of the turn across the road.
- Final Traffic Check: Before making your first move, perform one last comprehensive check for traffic. Look over both shoulders and in all your mirrors.
Developing this habit of constant observation and communication is a core principle taught in quality defensive driving courses. A safe driver is always aware of their surroundings and signals their intentions clearly.
The 3-Point Turn: A Step-by-Step Breakdown
With your car positioned and the road clear, you are ready to begin the three-point sequence. Perform each step slowly and deliberately.
Point 1: Forward Motion to the Left
The goal of this first step is to move the front of your car from the right side of the road to face the opposite curb.
- Signal Left: Your car is stopped on the right. Now, turn on your left turn signal. This signals your intention to move across the lane of travel.
- Turn the Wheel Completely to the Left: While the car is still stationary, turn the steering wheel all the way to the left (counter-clockwise) until it locks. Doing this before you move ensures the tightest possible turn.
- Creep Forward Slowly: Release the brake and allow the car to creep forward. If needed, apply very gentle pressure to the accelerator. Move slowly across the road, heading toward the opposite curb.
- Stop Before the Curb: Keep moving until your front wheels are about 6-12 inches away from the curb on the opposite side. Do not hit the curb. Stop the car completely. Your vehicle is now angled across the road, blocking both lanes.
Point 2: Reversing to the Right
Now you need to back up to create enough space to complete the turn and drive forward.
- Shift to Reverse and Turn the Wheel: Shift the gear selector into Reverse (R). Immediately, turn the steering wheel all the way to the right (clockwise) until it locks. Again, do this while the car is stationary.
- Look Over Your Right Shoulder: This is crucial. While mirrors are helpful, you must turn your head and body to look out the rear window to get a clear view of where you are going. This allows you to check your blind spot and accurately judge the distance to the curb behind you.
- Back Up Slowly: Gently release the brake and begin backing up. Your car will swing back across the road.
- Check the Front and Back: As you back up, you need to be aware of two things simultaneously: the distance to the curb behind you (by looking over your shoulder) and the clearance of your front bumper in relation to the opposite curb (by quickly glancing forward).
- Stop When You Have Enough Room: Continue backing up only as far as you need to. The goal is to create enough space for your car to pull forward and clear the curb in the final step. In most cases, you will not need to back up all the way to the starting curb. Once you judge that you have enough clearance in front of you, stop the car.
Point 3: Forward Motion to Drive Away
This is the final step that straightens you out in the new direction.
- Shift to Drive and Turn the Wheel: Shift the gear selector into Drive (D). Turn the steering wheel all the way to the left (counter-clockwise).
- Check Traffic Again: Before you move, quickly check for any traffic that may have appeared.
- Accelerate and Straighten: Gently press the accelerator and move forward into the correct lane of travel. As the car straightens out, begin to straighten the steering wheel.
- Proceed with Caution: Once you are fully in the lane and heading in the correct direction, you can resume a normal speed.
It sounds like a lot to remember, but practice builds muscle memory. The sequence of “left, right, left” for your steering wheel becomes second nature over time. For many of our students, having an instructor talk them through it a few times is all it takes for the process to click. Many of our students’ testimonials mention how our instructors’ patient and clear directions make complex maneuvers like this feel simple.
Common 3-Point Turn Errors and How to Avoid Them
As with any new skill, beginners often make a few common mistakes. Understanding them is the first step to avoiding them.
Mistake 1: Not Starting Far Enough to the Right
If you don’t pull your car all the way to the right side of the road at the beginning, you won’t have enough room for the first turn. You may end up hitting the opposite curb before your car is angled enough.
- The Fix: Be deliberate in your setup. Before you start the turn, make sure your car is stopped as close to the right-hand curb or edge of the road as is safely possible.
Mistake 2: Dry Steering
“Dry steering” is turning the steering wheel while the car is completely stationary. While you do set your wheel direction before each point, you want to avoid excessively turning it without any vehicle movement. This puts unnecessary strain on your tires and steering components.
- The Fix: Try to coordinate your steering with the very beginning of your car’s movement. As you just start to release the brake, begin your turn. This makes the steering smoother and is better for your car.
Mistake 3: Backing Up Too Far in Point 2
Many new drivers back up much further than they need to in the second step, sometimes hitting the curb behind them.
- The Fix: Remember, the goal of Point 2 is simply to create enough clearance for your front bumper to swing around. As you are backing up, keep glancing forward. The moment you see that the front of your car has enough room to clear the curb when you pull forward, you should stop. You often only need to back up a few feet.
Mistake 4: Forgetting to Check for Traffic
This is the most dangerous mistake. A driver might become so focused on the steps of the maneuver that they forget to keep scanning for other cars.
- The Fix: Make traffic checks a conscious part of every step. Pause for a second before each point and do a quick scan of your mirrors and surroundings. This should be a non-negotiable habit. The 5 Hour Pre-Licensing Class dedicates significant time to hazard awareness and the importance of constant scanning, reinforcing this critical habit.
Practice Makes Perfect: Building Your Confidence
You can’t expect to master the 3-point turn just by reading about it. You need to get out and practice.
- Start in an Empty Parking Lot: Just like with parallel parking, a large, empty parking lot is the perfect training ground. Use the parking lines to simulate the “curbs” of a narrow street. This lets you focus on the steering and vehicle control without the pressure of traffic or real curbs.
- Use Cones as Guides: Set up two cones (or other soft markers) to represent the edges of the road. Practice turning between them.
- Graduate to a Quiet Street: Once you feel comfortable with the mechanics, find a quiet, wide residential street with no traffic. Practice the maneuver using the real curbs. The tactile feedback of a real road environment is invaluable. As you improve, find progressively narrower streets to challenge yourself.
- Slow is Smooth, and Smooth is Fast: Your goal is not to do it quickly, but to do it correctly. Focus on being deliberate and precise with each movement. Speed will come naturally with confidence and practice.
If you’d like feedback or support while learning, scheduling driving lessons with a professional instructor ensures you’re building the right skills with expert guidance.
The Role of Professional Instruction
While practicing on your own is important, professional guidance can dramatically speed up your learning curve and ensure you develop correct habits from the start. A certified driving instructor can:
- Provide a Safe Learning Environment: With a dual-control car, an instructor can intervene if you make a mistake, ensuring your safety.
- Offer Real-Time Feedback: They can immediately tell you if you’re turning the wheel too soon, not backing up enough, or forgetting to check a blind spot.
- Tailor Instruction to You: An instructor can identify your specific challenges and provide targeted tips and exercises to help you overcome them.
Investing in a package of driving lessons is an investment in your safety and confidence for a lifetime of driving. Supplementing lessons with a defensive driving course can also enrich your hazard awareness and safer habits for real-world conditions. If you’re preparing for your road test or just want to become a more skilled driver, don’t hesitate to contact us. We can design a lesson plan that focuses on the specific skills you want to master.
The 3-point turn is a test of precision and awareness. By breaking it down into three simple steps and practicing it in a safe environment, you can transform it from a source of anxiety into just another confident move in your driving repertoire. And when you’re ready to hear stories from fellow learners, explore our testimonials for inspiration and reassurance!
Learn to Drive with Superior Driving School
We believe these lessons can last a lifetime and know they result in safer roads and save lives! We have been a trusted Queens NY driving school for more than two decades!
Contact Us