Stepping into the driver’s seat for the first time can feel like sitting at the controls of a spaceship. A dashboard full of glowing lights, mysterious symbols, and swinging needles can be overwhelming. What do all these things mean? What happens if one of them lights up? Understanding your vehicle’s instrument panel is one of the first and most crucial steps toward becoming a confident driver. These gauges and lights are your car’s way of communicating with you, providing vital, real-time information about its health and performance.
This guide will serve as your translator. We will break down each major instrument and warning light on your dashboard, explaining what it does, why it’s important, and what you should do when it tells you something. Learning this language will not only demystify your car but also empower you to be a safer, more responsible driver. This knowledge is a fundamental part of the curriculum in our driving lessons, setting a strong foundation before you even start the engine.
The Anatomy of Your Dashboard: An Overview
While the exact layout and design of a dashboard can vary between manufacturers and models, the core instruments are largely universal. They are designed to be read at a quick glance, so you can keep your attention focused on the road. Generally, your dashboard is split into two categories: primary gauges that you will monitor regularly, and warning lights that illuminate only when there’s an issue. Let’s start with the gauges you’ll be looking at most often.
Primary Gauges: Your Driving Vitals
These are the main dials or digital readouts on your instrument cluster. They provide constant feedback on your speed, engine status, and fluid levels. Think of them as your car’s vital signs.
1. The Speedometer: Your Velocity at a Glance
This is arguably the most familiar and important gauge on your dashboard.
- What it does: The speedometer displays your vehicle’s current speed. In the United States, this is shown in miles per hour (MPH), often with a smaller, secondary scale for kilometers per hour (km/h).
- Why it’s important: Driving at a safe and legal speed is fundamental to road safety. The speedometer is your only tool for accurately judging your speed. It helps you adhere to posted speed limits, adjust your speed for weather or traffic conditions, and maintain a safe flow with other vehicles. Consistently checking your speedometer is a habit that prevents speeding tickets and, more importantly, accidents.
- How to read it: Most analog speedometers have numbers in increments of 10 or 20 MPH, with smaller tick marks in between representing 1, 2, or 5 MPH. Digital speedometers provide an exact numerical readout, which is even easier to interpret. During your first few driving lessons, your instructor will help you get comfortable with glancing at the speedometer without taking your eyes off the road for too long.
2. The Tachometer: Monitoring Your Engine’s Effort
Often located right next to the speedometer, the tachometer looks similar but measures something completely different.
- What it does: The tachometer measures your engine’s speed in revolutions per minute (RPM), indicated by a scale from 0 to 8 (or higher), with the numbers representing thousands of RPMs. So, if the needle points to “2,” your engine is spinning at 2,000 RPM.
- Why it’s important: While the tachometer is critical for drivers of manual transmission cars (who use it to know when to shift gears), it’s still useful in an automatic. It gives you a sense of how hard the engine is working. For example, when you accelerate sharply, you’ll see the RPMs jump. If you notice the RPMs are consistently high while you’re cruising at a steady speed, it could indicate a problem with the transmission. The redline area on the gauge indicates the maximum safe engine speed. Pushing the engine into the redline can cause severe damage.
- How to read it: Simply note the number the needle is pointing to and multiply by 1,000. For most everyday driving in an automatic car, the engine will operate between 1,500 and 3,000 RPM.
3. The Fuel Gauge: Your Lifeline to the Gas Station
This simple gauge prevents one of the most avoidable driving mishaps: running out of gas.
- What it does: The fuel gauge provides an approximate reading of how much fuel is left in your vehicle’s tank.
- Why it’s important: Running out of fuel can leave you stranded in a dangerous or inconvenient location. It can also be bad for your car, as the fuel pump can be damaged by running dry. Making a habit of checking your fuel gauge every time you start the car is essential.
- How to read it: The gauge is marked with “F” for full and “E” for empty. A small arrow icon next to the fuel pump symbol on the gauge is a helpful trick—it points to the side of the car where the fuel door is located! It’s a best practice to refuel when your tank reaches the quarter-full (1/4) mark. This gives you plenty of time to find a gas station and prevents you from running on fumes.
4. The Temperature Gauge: Keeping Your Engine Cool
Overheating is one of the most common causes of major engine damage. This gauge is your early warning system.
- What it does: The temperature gauge monitors the temperature of your engine’s coolant. This fluid circulates through the engine to absorb excess heat and keep it operating within a safe temperature range.
- Why it’s important: An engine that overheats can lead to catastrophic failures, such as a cracked block or warped cylinder head, resulting in thousands of dollars in repairs. This gauge allows you to spot a problem before it becomes critical.
- How to read it: The gauge is marked with “C” for cold and “H” for hot. When you first start the car, the needle will be at “C.” As you drive, it should rise to the middle of the range and stay there. If you ever see the needle climbing toward “H” or entering the red zone, you need to act immediately. Pull over to a safe location as soon as possible, turn off the engine, and let it cool down. Do not attempt to open the radiator cap when the engine is hot, as the pressurized coolant can cause severe burns. Once it’s cool, you may need to add coolant or call for assistance. This is a critical safety topic covered in our defensive driving course.
5. The Odometer and Trip Meter: Tracking Your Travels
Usually a digital display, the odometer and trip meter keep track of your mileage.
- What it does: The odometer records the total number of miles the vehicle has ever been driven. This number cannot be reset. The trip meter, or “tripmeter,” records the mileage over a shorter, specific period and can be reset at any time, usually by pressing a button.
- Why it’s important: The odometer is crucial for determining the vehicle’s value and for tracking maintenance intervals (like oil changes and tire rotations). The trip meter is a convenience feature, useful for calculating fuel economy on a tank of gas, tracking the distance of a road trip, or measuring your commute.
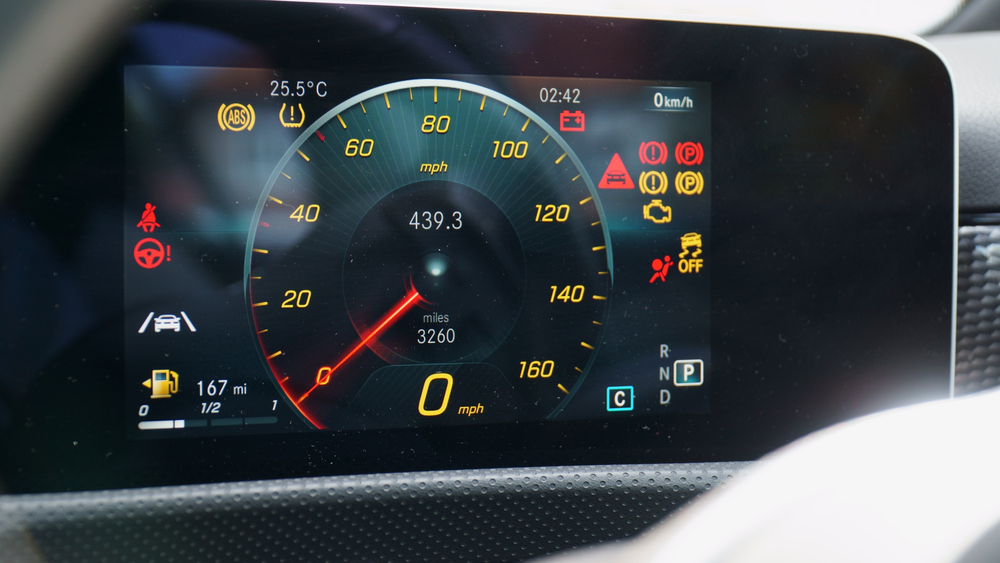
Warning Lights: Your Car’s SOS Signals
Warning lights are different from gauges because they are not always on. They illuminate to alert you of a specific issue, ranging from a minor reminder to a critical system failure. These lights are often color-coded to indicate urgency:
- Red: Indicates a serious problem or safety issue. Requires immediate attention.
- Yellow/Orange: Indicates a potential issue or a system that needs to be serviced soon. Proceed with caution.
- Green/Blue: Indicates that a system is on and operating (e.g., headlights or turn signals). These are informational, not warnings.
Here are some of the most common and important warning lights you need to know.
Red Warning Lights (Urgent)
If you see one of these, you should safely pull over, stop the car, and investigate the issue.
- Oil Pressure Warning Light (Oil Can): This light looks like an old-fashioned oil can. It means the engine has lost oil pressure. This is extremely serious. Without oil pressure, the engine’s internal parts are not being lubricated, which can cause it to seize up and destroy itself in minutes. Stop the car immediately and do not restart it until the oil level has been checked.
- Engine Temperature Warning Light (Thermometer in Water): This is the light version of the temperature gauge moving to “H.” It means your engine is overheating. Pull over immediately and turn off the engine.
- Brake Warning Light (Exclamation Point in a Circle or “BRAKE”): This light has two primary meanings. It could mean your parking brake is still engaged. If you’ve released the brake and the light stays on, it signifies a serious problem with your braking system, such as low brake fluid or a hydraulic system failure. Do not drive a car with a brake warning light on.
- Battery/Charging System Warning Light (Battery Symbol): This light indicates that the car’s electrical system is no longer being charged by the alternator. Your car is now running solely on battery power, which will soon be depleted, causing the car to shut down. You have a limited amount of time to get to a safe place or a repair shop.
- Seat Belt Reminder Light (Person with Seatbelt): A simple but vital reminder that you or your front passenger has not buckled up.
Yellow/Orange Warning Lights (Caution)
These lights signal a problem that is less critical but still requires your attention.
- Check Engine Light (Engine Outline): This is one of the most misunderstood lights. It can illuminate for a huge variety of reasons, from something as simple as a loose gas cap to a more serious engine misfire. When it comes on, you should have the vehicle diagnosed by a mechanic. If the light is flashing, it indicates a severe problem (like unburned fuel entering the exhaust system) that could damage the catalytic converter. In this case, you should reduce your speed and get to a service center as soon as possible.
- Tire Pressure Monitoring System (TPMS) Light (Exclamation Point in a Horseshoe): This light means that the air pressure in one or more of your tires is significantly low. You should check your tire pressure with a gauge as soon as possible and add air as needed. Driving on underinflated tires is unsafe, reduces fuel economy, and causes premature tire wear.
- Anti-lock Braking System (ABS) Light: The ABS is a safety feature that prevents your wheels from locking up during hard braking. When this light is on, it means the ABS system has a fault. Your regular brakes will still work, but you won’t have the anti-lock assistance in an emergency stop. You should have the system serviced.
- Traction Control/Stability Control Light (Car with Squiggly Lines): This light may flash during normal operation when the system is actively working to prevent wheel spin on a slippery surface. If the light stays on steadily, it indicates a fault in the traction or stability control system.
Blue/Green Indicator Lights (Informational)
These lights simply let you know that a feature is active.
- High Beam Indicator (Blue Headlight Symbol): This light is on when you have activated your high-beam headlights. Remember to switch back to low beams when approaching other vehicles to avoid blinding them.
- Turn Signal Indicators (Green Arrows): These arrows flash in the direction of your turn when your turn signal is activated. If a signal arrow is blinking much faster than usual, it typically means one of your turn signal bulbs has burned out.
- Headlight Indicator (Green Headlight Symbol): Informs you that your main headlights are on.
Putting It All Together
Understanding these instruments is a core part of the knowledge required by the state, much of which is covered in the mandatory 5-hour pre-licensing class. This classroom knowledge becomes practical skill behind the wheel. During your first few drives, it might feel like you’re trying to watch the road, check your mirrors, monitor your speed, and keep an eye on all these gauges at once. It’s a lot to juggle.
The key is to develop a scanning routine. Your primary focus must always be on the road ahead. However, your visual scan should include quick, regular glances at your speedometer and mirrors, and a periodic check of your other gauges like fuel and temperature. With practice, this becomes second nature. Many of our students have shared in their testimonials how their instructors helped them build this crucial habit.
Learning what your car is telling you is an empowering part of the driving journey. It transforms you from a passive operator into an engaged and informed driver, capable of anticipating issues and reacting to problems before they become emergencies. This knowledge not only keeps you safe but can also save you significant money on repairs by catching problems early.
If you have more questions about your car’s features or are ready to start your journey to becoming a licensed driver, we are here to help. Feel free to contact us to learn more about our comprehensive lesson packages.
Learn to Drive with Superior Driving School
We believe these lessons can last a lifetime and know they result in safer roads and save lives! We have been a trusted Queens NY driving school for more than two decades!
Contact Us